8.3. Enter Additional Enrolment Details
We now begin to enter the additional information related to the enrolling child. In normal circumstances (when the Spike system is fully implemented) this data will be entered along with the rest of the child's enrolment information as a matter of course.
8.3.1. Associate Adults with the Enrolling Child
The first process is to enter the names and details of adults associated with a particular child, their relationship, emergency contact priority number and any access restrictions that may apply
Steps to: Enter Associated Adults to the Child
Select menu BOOKING+BILLING / CHILD.
Select the ADULTS Tab.
Bring forward the edit screen by Double Clicking between the Railway Lines
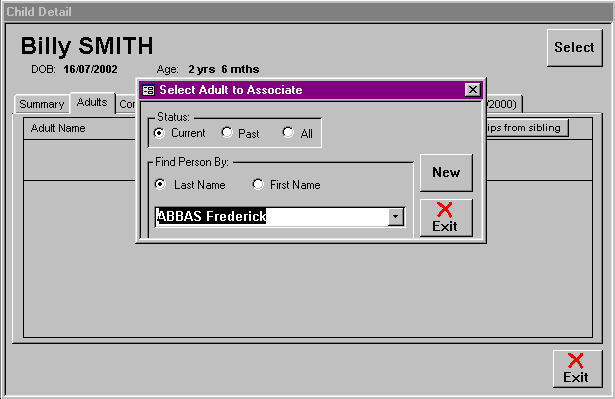
If the adult is already known to the service select their name from the Draw-down Selection List (Go to Step 10.)
Otherwise, select NEW.
This brings forward the Adult Update screen
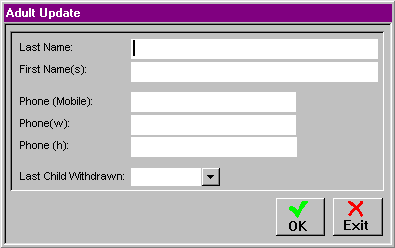
Type in the name.
Enter the adult's telephone contact details.
Select OK
This brings forward the Child/Person Association Update edit screen.
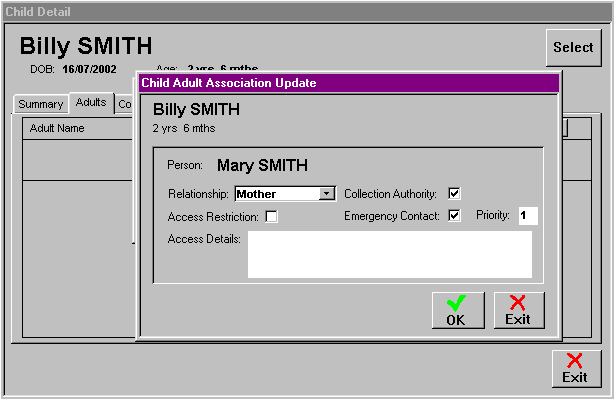
Identify the adult's relationship with the child by clicking on the down arrow and selecting from the list.

To save time you can simply type in the first and/or second letter of their relationship e.g. m for mother, f for father, fr for friend.
If the adult has the authority to collect the child, select that Check Box.
If the adult is an emergency contact for the child, select that Check Box.
You will then need to choose a number between 1 and 9 that represents the priority in which they should be contacted in an emergency).
Select OK.
If they have an access restriction, select that Check Box.
If there is a Court Order in effect which imposes an access restriction upon an adult, enter the adult and relationship and select the Check Box which indicates an access restriction.
Enter the access details in the space provided.
Select OK.
This completes the information that needs to be entered regarding an adult. If there are two or more people associated with that child (eg. two parents) you will need to repeat this process for all other adult/s.
In the case of siblings with the same adult associations attending your service also, a SHORTCUT instead of re-entering them all is to copy the relationships from the other sibling.
Steps to: Copy Adult Associations from Sibling
Select the ADULTS Tab
Select COPY RELATIONSHIPS FROM SIBLING button
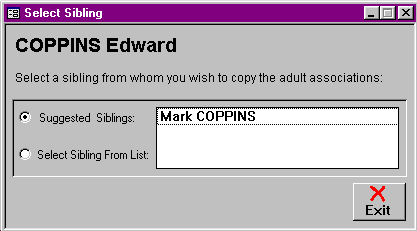
It may suggest a sibling, if correct select it, if not:
Click on the 'Select Sibling from List' Radio Button
Select sibling from the Draw Down Selection List
Select EXIT.
8.3.2. Enter the Child's Consents
On Page 3 of the Spike Enrolment Form you will find which consents have been initialled by the enrolling parent/guardian.
Steps to: - Check the Parental Consents for the Child
Select the child you wish to check the parental consents for, from the Draw Down Selection List
N.B. If you are entering all of the Supplementary Information for a child at one time, you don't need to keep selecting the child's name from the Draw Down Selection List.
In the CHILD DETAIL screen, select the CONSENTS Tab.
Bring forward the edit window by Double Clicking on the Blank Railway Line.
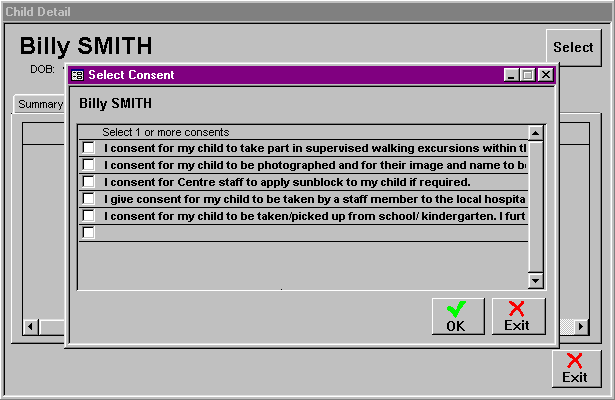
Click in the check box of each consent that has been given for the child.
Select OK.
8.3.3. Enter the Immunisations
It is your Duty of Care for your service to keep accurate immunisation records of children in care. After entering this information you can easily print off a report to keep on hand to access it in the case of an emergency or disease outbreak.
Steps to: - Enter the Immunisation History of a Child.
Select the IMMUNISATIONS Tab in the Child Detail Screen.
Select the SCHEDULED Tab in the Immunisation Screen.

Select the appropriate age for the child you are enrolling and double click in the Railway Line.
When the enrolment form indicates that the child's immunisations are up to date for their age, select COMPLETE ALL.
Alternatively, you can double click on all of the age groups separately and individually complete each schedule.
Note: This method would be necessary if the child was behind in some of the immunisations.
If a child has had additional immunisations eg chickenpox, or received a Natural Homeopathic Immunisation, select the NON SCHEDULED Tab in the Immunisation Screen.
Double click in the Blank Railway Line.
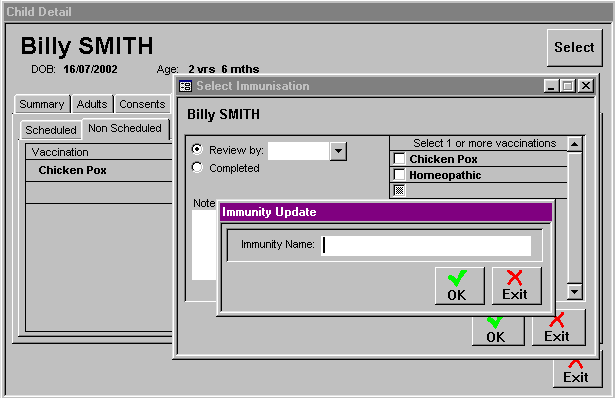
Click in a Check Box on the right hand side of the SELECT IMMUNISATION screen to select an existing immunisation type, or
Create a new immunisation type.
Steps to: - Create a New Immunisation Type
Double Click on the blank Railway Line on the right hand side of the SELECT IMMUNISATION screen to bring forward the IMMUNITY UPDATE screen.
Enter the name of the new immunisation.
Select OK.
Click in the Check Box to select the new immunisation type.
Enter the date at which that immunity is to be reviewed (i.e. when this vaccination is next due) and/or any relevant notes. If the immunisation schedule is complete for this immunity, indicate this is the case by clicking in the Check Box.
Select OK when you have finished.
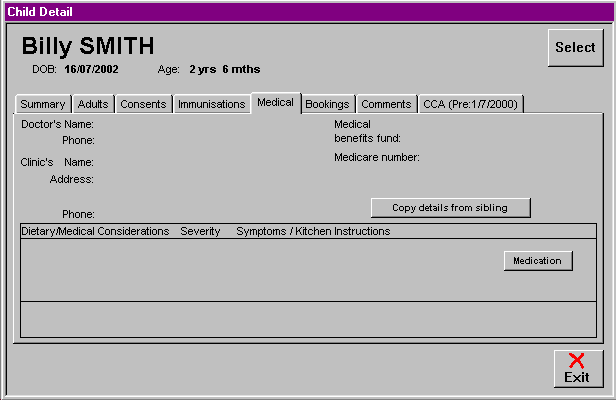
8.3.4. Enter a Child's Medical Information
Steps to: - Enter a Child's Medical Details
This card maintains a record of the child's usual medical attendant, medical insurance information and any dietary or medical conditions that s/he has. This information is very useful in the event of an emergency but is also used on a daily basis to produce lists of the children's special needs.
Select the MEDICAL Tab in the Child Detail Screen.
If the child has had a sibling enrolled at the service with the same Medical Details, you may duplicate the MEDICAL DETAILS for the enrolling child by:
Selecting the COPY DETAILS FROM SIBLING Button.
Select the sibling from whom you wish to copy the Miscellaneous Medical Details.
If you need to enter the Medical Details from the enrolment form:
Bring forward the MISCELLANEOUS MEDICAL DETAILS edit screen by Double Clicking on the Medical Card
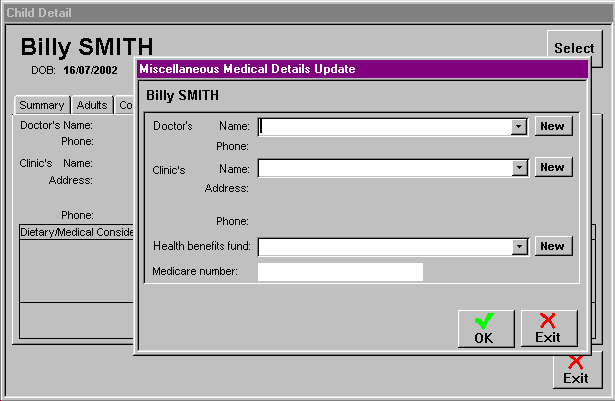
If the child's usual medical attendant is already known to your service, select their name from the Draw Down Selection List.
If they are new to the service, select NEW and enter their details in that window.
To enable you to select existing doctors more quickly, always enter the surname of the doctor first, followed by his/her initials or given name.
Select OK.
If the child's medical clinic is already known to your service, select the clinic from the Draw Down Selection List
If the clinic is new to your service, select NEW and enter the details in the window
Select OK.
Select the child's health fund or if it is a new fund, click on the NEW button and enter the required details.
Type in the family's Medicare Number.
Select OK when you have finished.
Steps to: - Enter Dietary and Medical Considerations
Bring forward the update window for this information by Double Clicking on the Blank Railway Line.

If the child's dietary or medical condition is listed in the Draw Down Selection List, select it, otherwise:
Select NEW
This brings forward the CONDITION UPDATE edit screen.
Type in the name of the condition.
If it is a dietary condition, identify it as such.
Click on OK when you have finished.
Select the severity, if applicable, of the medical or dietary condition.
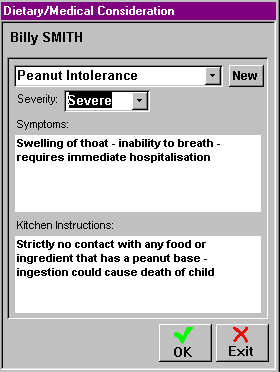
Enter any symptoms and Kitchen instructions that you are aware of.
If the child has a medical or dietary condition, you should also record the details of any relevant medication.
Steps to: - Enter Medication Details
Select the MEDICATION option.
Bring forward the update screen by Double Clicking on the Blank Railway Line.
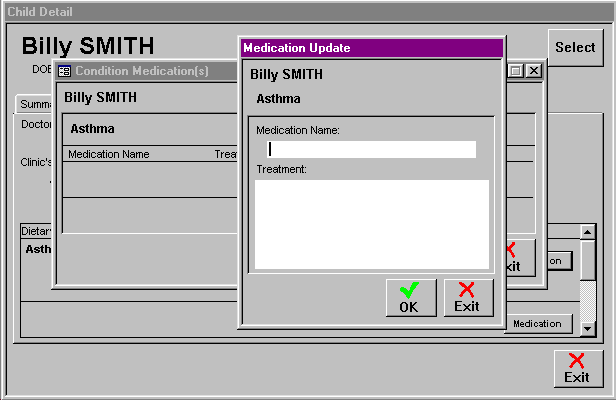
Enter the name of the medication.
Enter relevant notes such as dosage or frequency of use.
8.3.5. Enter Comments
Steps to: - Enter Comments to Child Details
Select COMMENTS Tab.
Bring forward the edit screen by Double Clicking on the Card.
Type in the comments you wish to enter.
Select OK when finished.