8.2. The Fast Track Enrolment Process
The fast track process for enrolling a child is aimed to speed up the initial task of entering all of the service's existing children, bookings and accounts into the Spike system. Although a 'bare bones' process, it ensures that an accurate bill for each child's attendances will be charged to the correct account with CCB adjustments where applicable.
In normal circumstances, ie. once the Spike system has been established at your service, the full enrolment process should be completed as one operation for each newly enrolled child.
Fast track enrolment entails the following:
From the enrolment form
Enter the child's personal details
Enter account details
Enter bookings
Establish account opening balance
Enter FAO Child Care Benefit details from the FAMILY ASSISTANCE OFFICE 'Weekly CCB Statement' as soon as it arrives.
All other details - ie. adult associates and emergency contacts, consents, access and custody orders, medical and health information, - may be entered at your convenience without affecting the integrity of bookings and billings and room Attendance Sheets. In the meantime these details are available in hard copy from the enrolment form.
It is recommended that you enter the supplementary information as soon as practicable so that the wide range of reports available can be automatically generated.
8.2.1. Entering a Child's Details
The first step in enrolling a child in your service is to enter the child's personal details. Most of these details will be found on the first page of the Spike Enrolment Form filled in by the enrolling parent/guardian, you will need to know whether the child attends school or not and you will need to receive notification of the child's Customer Reference Number from the Family Assistance Office for Child Care Benefit to be administered.
Steps to: Entering a New Child
Select menu BOOKING+BILLING / CHILD.
Select NEW. This will bring forward the CHILD UPDATE edit screen
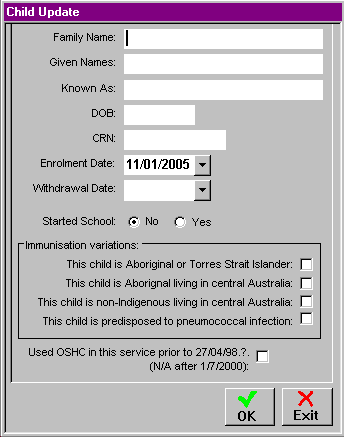
Enter the child's summary information from the Enrolment Form (ie. their family name and given name/s, an affectionate nick name if they have one, and their date of birth). Their age will be calculated automatically.
Enter the child's Customer Reference Number (If you haven't received notification of the child's CRN, leave blank but ensure that it is entered AS SOON AS YOU RECEIVE IT)
Enter the Enrolment Date
N.B. If the child was enrolled on a previous date, it is essential that you type in that date otherwise today's date will automatically be entered as their date of enrolment
Select the Radio Button to indicate whether or not the child has started school
Click in the square next to an Immunisation Variation if appropriate.
Select OK when you have finished.
8.2.2. Establish the Billable Account
Every booking for child care must be attached to an account which is responsible for paying the bill for that booking. Thus, in setting up the bookings and billings for a particular child, it is best practice to establish the account before or at the same time as attempting to make any bookings.
In some cases there may be more than one person who will pay the bills for a particular child or family. For example, separated parents may each be responsible for paying child care fees for the period that the child is in their care. In such cases your aim is to be able to generate separate bills for each parent that only charges for the sessions for which the parent is responsible.
Depending on the Child's account situation, you may wish to create all accounts responsible for the child's bookings and then enter the child's bookings OR you can create a new account at the same time as entering bookings.
Your Responsibilities.
Decide whether to create the accounts first or at the same time as the bookings.
Each enrolment is a process of making a series of bookings for a particular child and linking those bookings to an account. You need to make sure that the right bookings are linked to each account.
For step-by-step details on how to establish a Billable Account please refer to Chapter 8 of this manual.
Steps to: Establishing an Account with bookings
Select the BOOKINGS Tab.
From the calendar view on the left of the screen, select the commencing day of the booking period.
To bring forward the SELECT BOOKINGS ACCOUNT edit screen, either:
Double click on the date on the calendar.
Double Click on the Blank Railway Line in the middle section
Double Click in the box on the right hand side of the window.
Select EXISTING/NEW ACCOUNT Radio Button.
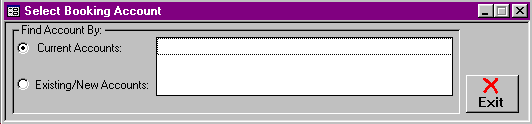
If the booking is to be charged to an existing account with the service, eg. you have already entered child's sibling and they are to be paid for by the same account, use the Draw Down Selection List arrow to choose the account holder.
If you need to create a new account holder, select NEW, and this brings forward the ACCOUNT UPDATE screen.
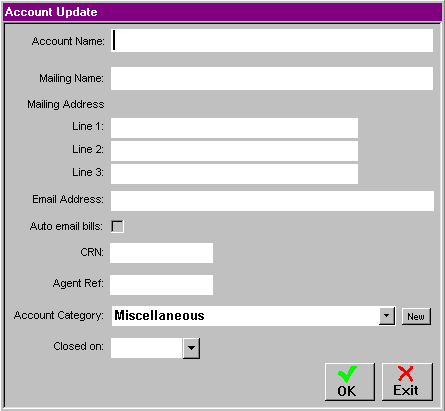
Enter the account details as detailed in Steps to: Create a New Account outlined in Section 10.2.
Click on the OK button, this takes you to the ADD BOOKING DETAIL screen.
Now you can add or select bookings to be paid for by this account.
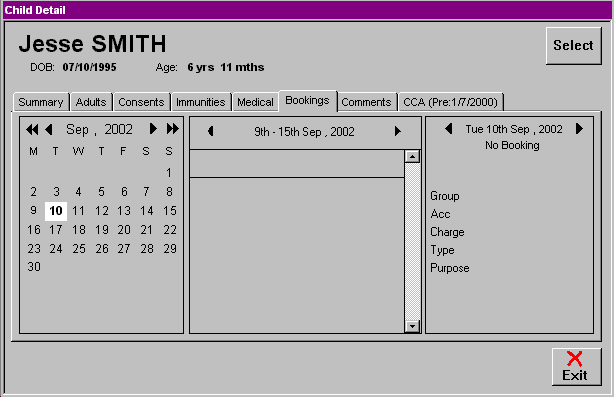
8.2.3. Enter a Child's Bookings
This task presumes that you have already created the account which will pay for these bookings. The next step is to enter the dates and times that the child is going to be attending your service and to select which group he or she is going to be enrolled in.
This is one of the most important sections of the software because it provides the information that will be used to generate the bills for each family. If some of the child's bookings are to be paid by another account, compartmentalise the booking procedure by account, ie. enter all the bookings to be paid by one account, then select or create the other account and enter all the bookings to be charged to it.
Your Responsibilities.
Ensure that all the information that you enter is correct.
Ensure that all of the bookings have been entered.
Ensure that bookings are associated with the correct account.
Steps to: - Enter a Child's Bookings
Each different time that the child will be attending the service must be entered separately. For example, if the child is attending Monday and Wednesday mornings and Thursday and Friday afternoons, the morning bookings and the afternoon bookings must be entered separately. However, if the child is attending at the same time on each day then all of the bookings can be entered at the same time.
Select BOOKING+BILLING / CHILD
Enter details for a new child or select the child from the Draw Down Selection List
Select the BOOKINGS Tab
In the calendar view (left panel of the card) select the commencing day of the booking period.
Begin the booking edit process by either:
a Double Click on the commencement date you have already selected in the Calendar.
a Double Click in the Week display (the Blank Railway Line in the middle of the window) OR
Double click in the box on the right hand side of the window.
This brings forward the SELECT BOOKING ACCOUNT screen as outlined above.
Select the name of the account responsible for these bookings by either:
Clicking on the 'Existing/New Accounts' Radio Button and selecting the existing account from the Draw Down Selection List, if this is the first time you have entered bookings using this account for this child.
Clicking on the 'Existing/New Accounts' Radio Button and selecting the NEW button to enter a new Account name, if you are required to bill to a separate account for the first time eg if the child's parents have recently separated.
Click on the account listed in 'Current Accounts', if you have previously entered bookings using this account for this child.
This brings forward the ADD BOOKING DETAIL screen.
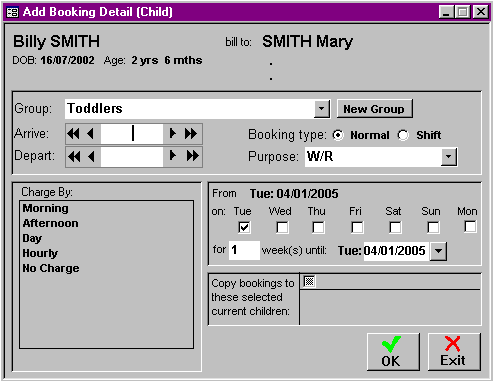
Select the group that the child will be booked into.
Enter the times at which the child will arrive and depart.

Entering Times - you don't need to enter am as that is set as the default (e.g. if you type in 6.30 it will be interpreted as 6.30 am). If you want to enter a pm time just type p (e.g. 6.30p will be interpreted as 6.30 pm). Some other time time-savers are as follows:
6.3 = 6.03 am
6.0 = 6.00 am
18.0 = 6.00pm
Select the Charge Type that will apply.
Identify which day/s of the week this booking is for.
Determine how many weeks this booking will last. The software will automatically calculate the expiry date of the booking.
Select OK when you have finished.
Repeat this process for each different time-slot for which the child has a booking.
- Make sure you have a common expiry date for all your bookings. It may be to the end of Term or Vacation Care period, or to the end of the calendar year (at which time you will then have to re-enter every booking for each child). In LDC it may be until the child turns five. A simple way of achieving an expiry date in LDC is to enter the date of the child's 5th birthday.
In a lot of instances, children associated with the same account, eg. siblings, step-siblings, will often be attending the service at the same times. To save time entering the same bookings again and again, the "Copy bookings to selected children" option means you only enter the bookings once but they will now be entered for each selected associated child.
Steps to: Copy bookings to all appropriate children associated with the same account
In the ADD BOOKING DETAIL screen, enter all booking details for the first child but don't select OK just yet.
In the bottom right-hand corner of this screen, you will see "Copy bookings to these selected children".

Select the Check Box of any pre-listed child who will attend the service at the same time as the child whose bookings you are entering.
If there are no pre-listed children, you will need to select the child you want associated from the 'Draw Down Selection List' by Double Clicking in the Blank Railway Line. After this the child will always appear in the automatic list in the ADD BOOKING DETAIL screen and will only require for you to select the Check Box.
With all associated children selected, select OK
Select the other children to confirm the bookings appear in their booking screen.
Bookings For a Child Will be Displayed By:
MONTH (left hand section of window) - each red number represents a booking on that day.
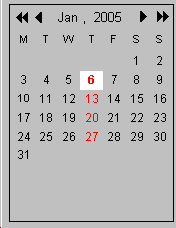
To go forward to the next month, click once on the single arrow on the right hand side of the current month and year
To go back a month, click on the left hand side single arrow.
To go move forward or backwards by year, click on the double arrows.
WEEK (middle section) - the bookings for each day and their times are listed
To move forward one week, click on the right hand side arrow.
To move backward one week, click on the left hand side arrow.
DAY (right hand section) - shows the bookings for a particular day; the group; who the account holder is; and what the charge is.
To move forward one day, click on the right hand side arrow.
To move backward one day, click on the left hand side arrow.
You have now completed the bare bones enrolment process which will allow accurate Group Attendance Sheets and bills to be generated from this child's bookings. The following processes for entering supplementary child information should be done as soon as practicable.