6.7. Set Centre/Service Policies for Allowable/Approved Absences
FAO Defined Tab - These are the FAO Defined Absences.
The Allowable Absence (AA) category has a parameter ('From' and 'To' dates)which defines the Annual allocation of absences.
This Allowable Absence will require a new parameter entry (new dates) each financial year.
You cannot edit or change these Defined Absences. A new Spike CD will be sent to you when the Commonwealth Government makes changes to these definitions.
Policies Tab - This is where you define your service policies related to Allowable Absences. eg if you give 50% discount for holidays, you will need to create an entry for each service policy.
Please consult your Commonwealth Handbook before creating your service policies for absences.
Steps to: Updating the Allowable Absence Parameters.
Select BOOKING+BILLING / CENTRE
Select the ABSENCES Tab.
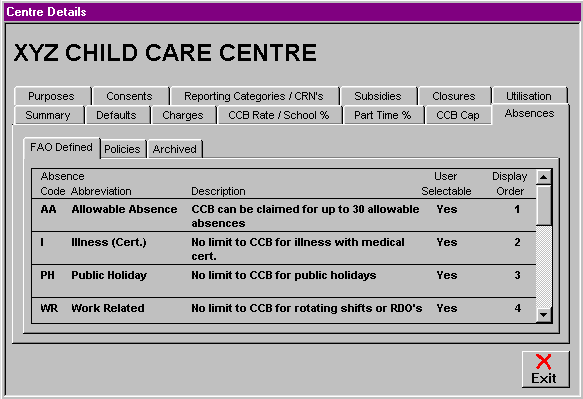
Select the FAO DEFINED Tab.
Double Click on the Allowable Absence Railway Line.
Double Click on the Blank Railway Line underneath the existing entry.
Enter the new date on which this allocation of absences expires.
Ensure the absence limit is entered (eg 30 days).
Select OK.
Steps to: - Editing an Allowable Absence Allocation Parameter
Note: You cannot edit or change the Absence Allocation Parameters once bills have been generated within the parameters.
Select BOOKING+BILLING / CENTRE
Select the ABSENCES Tab.
Select FAO DEFINED Tab.
Double Click on the Allowable Absence Railway Line.
Double Click on the last entered parameter.
Select DELETE.
Confirm that you do wish to delete those parameters.
Make the changes you require.
Select OK.
Steps to: - Enter a New service Policy for Absences
Select BOOKING+BILLING / CENTRE
Select the ABSENCES Tab.
Select the POLICIES Tab.
Double Click on the Blank Railway Line to bring up the service Absence Policy Update Window.
Enter the Policy Name.
Tick the User Selectable Check Box.
Enter the display order number you wish this Absence to appear in.
Select OK.
Double Click on the Railway Line containing the Policy you have just created.
Double click on the empty railway line.
Enter the effective 'From' date.
Enter the Maximum Absences Allowed, Days Notice required and a Discount Rate if appropriate.
Double click on the empty railway line in Associated Absences.
Select the Associated Absence (usually 'Allowable Absence')and hit the enter key.
Select OK.
Select EXIT.
Steps to: - Enter a New or Edit a service Absence Policy Parameter.
Select BOOKING+BILLING / CENTRE
Select the ABSENCES Tab.
Select the POLICIES Tab.
Double Click on the Absence which has parameters you wish to edit/define (you will need to edit the previous 'until' date).
Double Click on the Blank Railway Line underneath the existing entry (if there is an existing entry).
Enter the date range for these parameters to be effective ('until'date defaults to 100 years from the effective 'from' date).
Enter the limit of absences for this type of policy,(if there is no limit, enter 9999).
Enter the number of days notice required, if any, for that policy.
If applicable, enter the service discount to be applied to this policy.
Double click on the Blank Railway Line under 'Associated Absences' to tell the software which Absence this policy applies to.
Select OK.
Steps to: - Delete the Parameters of an Absence Policy
Select BOOKING+BILLING / CENTRE
Select the ABSENCES Tab.
Select the POLICY Tab.
Double click on the policy whose parameters you wish to delete.
Double click on the Railway Line containing those parameters.
Select DELETE.
Confirm that you do wish to delete that policy's parameters.
Steps to: - Delete an Entire Absence Policy
Select BOOKING+BILLING / CENTRE.
Select the ABSENCES Tab.
Select the POLICY Tab.
Double click on the policy you wish to delete.
Double click on the name of the policy.
Select DELETE.
Confirm that you do wish to delete that policy's parameters.
N.B. You cannot edit or delete a policy and/or its parameters if bills have been generated using that policy.