13.8. CCB Electronic Lodgement
Spike provides two different methods to make a quarterly claim for Child Care Benefit, or to produce data for a CCB Compliance Audit, i.e. the Electronic Disk Transfer method and a Manual Printed method.
The most commonly used method is the the Electronic Lodgement via Disk Transfer for both Primary and Supplementary Lodgements.
Your Responsibility.
All information entered must be an accurate reflection of the information you have received via Assessment Notices and Parent Statements etc.
Ensure all CRN's for families electing to claim CCB as a lump sum payment at the end of the year have been entered.
Ensure all your Service Type's CRN's have been entered into the CENTRE DETAILS.
Steps to: - Electronically Lodging your CCB Claim Using Disk Transfer
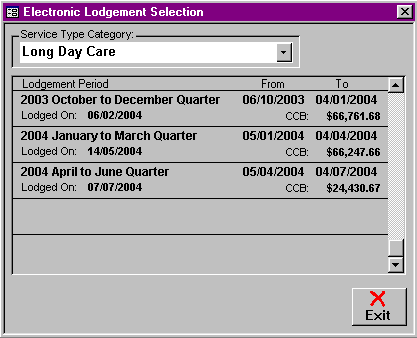
Select BOOKING+BILLING / OTHER / ELECTRONIC LODGEMENT / LODGEMENTS

From the Draw Down Selection List select the Service Type Category for which you wish to claim.
Double Click on the Blank Railway Line under 'Lodgement Period'.
The first time you double click on the Blank Railway Line on any computer (work station) you will be asked to specify the location where you want the lodgements saved. Subsequent lodgements will not require you to specify a path. However, if at a later time you need to change the location where the files are saved, you can do so by going to BOOKING+BILLING / OTHER / ELECTRONIC LODGEMENT / LODGEMENT FILE PATH.

The first time you lodge your CCB claim via Disk Transfer for each service type, you will need to select the claim period, but successive claims will default to the following claim period.
Confirm you have selected the correct claim period.
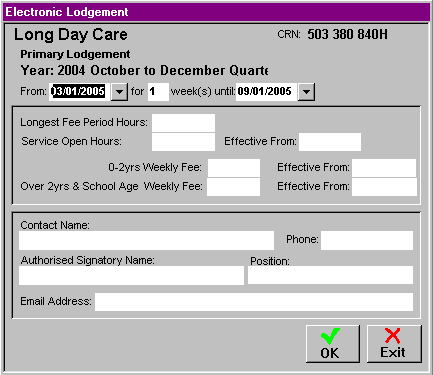
Enter the date range/number of weeks for this claim period.
Enter the total hours for the longest fee period this service type offers, eg. a Long Day Care or Vacation Care service might enter 10 or 11 hours to represent their Day Charge, and an After School Care service's longest charge might be 3.5 hours.
Enter the total service open hours and their 'effective from' date, eg. a Long Day Care or Vacation Care service open 11 hours per day, 5 days a week would enter 55 service open hours and an After School Care service open 3.5 hours each afternoon, 5 days a week would enter 17.5 service open hours.
Enter your weekly fees and their effective from dates, this is the full fee a child would be charged for attending that Service Type every day in a week.
Enter all Contact and Authorised Signatory details.
Select OK.
Confirm the type of lodgement and the period/dates for which you are claiming.
Your claim will be checked for any duplicate CRN's entered (if any). This may take a while depending on the size of your database but when its finished, you will be looking at the 'Copy Lodgement To Diskette' screen.
If duplicate CRN's are detected, you will need to note each one and amend these before the claim can be processed again.
Note: When a lodgement is generated a copy of the claim is automatically saved to your selected storage device. Each file Name is divided into five parts and knowing what each part represents will help you in the future if you need to manually locate the file for any reason.
CCB - simply indicates that it is a Child Care Benefit Claim.
xxx xxx xxxA - this will be the Service Type's CRN for which you are claiming.
In LDC 2002P01 - tells us the period we are claiming is Year 2002, Period 01, in OSHC 2002T01 - tells us the period we are claiming is Year 2002, Term 01. For Vacation Care lodgements the period is represented by B01 meaning Break 01. A Vacation Care break number directly follows a Term number eg Break 01 follows Term 01 etc.
20020128 - this is the date you processed the claim written backwards, so this one tells us the date the claim was processed was 28/l1/2002.
.dat - this is the type of file (eg. data).
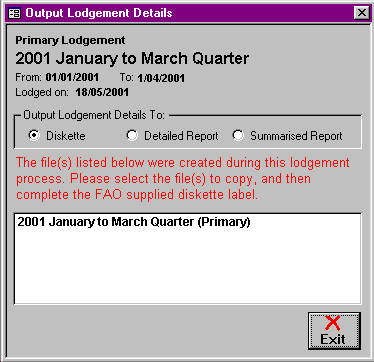
Once the lodgement has been generated an 'Output Lodgement Details' window will be displayed. You can select to output the claim details to Diskette - Detailed Report - Summarised Report by clicking in the Radio Button of the output required.

Steps to: Save Lodgement to Diskette
To save a lodgement file to diskette, select the desired file, remembering there may be more than one listed if one or more supplementary claims were found during the Lodgement process.

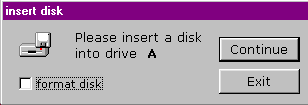
Insert your diskette into the A:/ drive when prompted. If the diskette has been used for other purposes then click the format disk check box.
In the 'Format Disk' screen, you can select either the Radio Button for Quick (Erase) or the the Radio Button for Full.
Quick (Erase) would normally be selected and will simply erase any files already on the diskette. Full will format the diskette and would rarely be used.
Select START.
When the Format Results screen appears, select CLOSE, and then CLOSE again on the Format Disk Screen.
Select OK when the 'Completed Successfully' message appears.
Repeat this process for every lodgement file needing to be sent to FAO. If you wish to save all files to the same diskette then make sure that the format disk check box is not selected for subsequent requests to insert your diskette.
You are now ready to complete your FAO Diskette Label and lodge your CCB Claim.
If you wish to know the details of the claim you have just generated, you can display and/or print the Detailed or Summarised Lodgement Report.
13.8.1. Displaying and/or Printing a Lodgement Report
When you click on the Radio Button to select either the Detailed Report or Summarised Report, you will be required to select the Primary or Supplementary claim you wish to have displayed as a report.
A window will open displaying the details of the selected Claim you have just generated, which you can print if required.
Note: As a Primary Lodgement can be a very large file, you may wish to check the number of pages by clicking on the double-headed arrow next to the page number at the bottom of the display screen, before printing.