11.7. Receive & Receipt Payment
When payment is made to an account it must be entered into the database, thus ensuring the accuracy and currency of the account record.
To maintain a system of checks and balances, you should first provide a manual receipt for the money and enter the amount received into the Cash Journal. The Cash Journal can then be compared with the Receipt Summary of entries in the database to cross-check accuracy (the recommended Spike one-write receipt system provides a receipt, banking record and enters a cash journal sheet in one operation).
The other key part in this process is telling the software how the money is to be used, ie. which transactions should be credited with the money received. For example, if there are a series of outstanding fees, an unpaid bond, and a Tri-skills charge, how is a payment to be allocated? Should it be paid off the oldest account first, off the bond, or off the last account? This is a decision that you must make.
Spike defaults the receipt type to the last one entered e.g. cheque, cash, and the receipt date also defaults to the date of the last entry. When entering a new receipt, check that the receipt type and the date are accurate for the receipt that you are currently entering.
Your Responsibility.
To make sure that the receipts for each account are recorded accurately in the Cash Journal and entered accurately in the database.
To determine, in line with the service's policy or procedure, how each payment of money is to be divided.
Steps to: Enter a Receipt
Select menu BOOKING+BILLING / ACCOUNTS.
From the Draw Down Selection List select the Account holder whose money you are receipting.
Select the HISTORY Tab.
Select RECEIPT button.
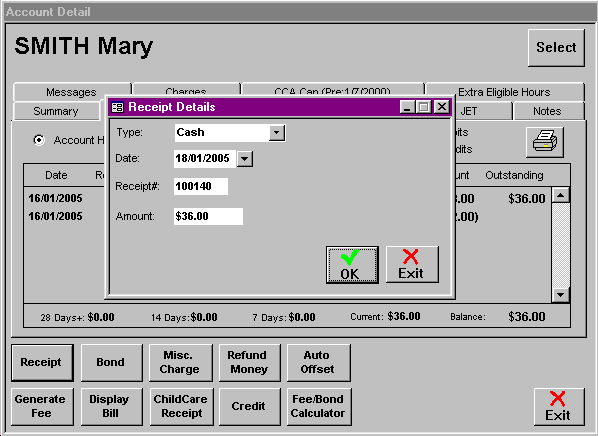
Select the type of payment (Bank Deposit/Transfer, Cash, Cheque, Credit Card, EFTPOS or Money Order).
If it is a Bank Deposit Receipt ie. the Customer already has an Agent No. and is using a pass book to pay their fees directly into your bank account:
Enter date money was received.
Enter your Manual Receipt No.
Enter the amount of the Receipt.
Select OK.
If it is a Bank Transfer ie. the Customer has a direct debit setup from their account to yours:
Enter date money was received.
Enter your Manual Receipt No.
Enter the amount of the Receipt.
Select OK.
If it is a Cash Receipt:
Enter date money was received.
Enter your Manual Receipt No.
Enter the amount of the Receipt.
Select OK.
If it is a Cheque Receipt:
Enter the date cheque was received.
Enter the Manual Receipt No.
Check the Drawer name is correct (defaults to the Account name). If not type in correct Drawer.

Select Bank No. from the Draw Down Selection List. If the matching number is not listed, click on the NEW button and enter the new details.
Select the Branch No. from the Draw Down Selection List. If the matching number is not listed, click on the NEW button and enter the new details, then
Enter the Cheque No.
Enter the amount of the cheque.
Select OK.
If it is a Credit Card Receipt ie. a Manually swiped Credit Card transaction has taken place:
Enter date money was received.
Enter your Manual Receipt No.
Enter the amount of the Receipt.
Select the type of Credit Card eg. VISA, MASTERCARD etc.
Select OK.
If it is an EFTPOS Receipt ie. your service has an EFTPOS setup through the bank for Debit and Credit Card transactions:
Enter date money was received.
Enter your Manual Receipt No.
Enter the amount of the Receipt.
Select OK.
If it is a Money Order Receipt.
Enter date money was received.
Enter your Manual Receipt No.
Enter the amount of the Receipt.
Select OK.
You must now tell the computer against which transaction the money is to be applied.
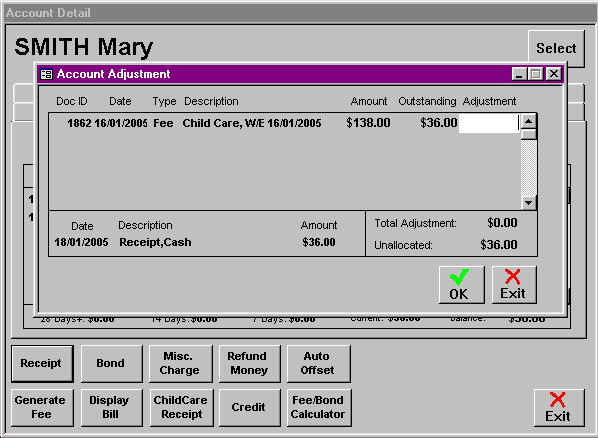
Select the transaction that you wish to apply the whole or part of the money to, and press ENTER or Double click in the corresponding white box.
Repeat this process until you have applied all the money or until all outstanding amounts are paid off.
Select OK.
N.B. If some of the receipt was left unallocated, you will need to confirm you wish to leave the unallocated amount in suspense, ie. Select the YES.
Using the ACCOUNT SELECT Button to choose the appropriate accounts, repeat this process for each payment received.