Chapter 5. Implement Password Security
Your Spike database stores details about your customers which is confidential and, therefore, not everyone using your computer is necessarily authorised to access this information. Some services who share a computer or have the computer easily accessible to others, may wish to assign passwords to only those persons authorised to access and edit details of their Spike database to ensure the integrity of the information retained.
REMEMBER! This is an optional feature of Spike, if you choose to use passwords, you will always ensure the security of the information stored but passwords must be selected very carefully as once they are activated, you will always need to enter one. If passwords are not used, anyone with access to your computer can access the information stored in Spike.
There are two default 'GROUPS' of password users on Spike, 'ADMINS' and 'USERS'. The most common Group members would be 'USERS' as these individuals can access all areas of Spike and change their own password. The 'ADMINS' Group can access everything 'USERS' access but also have the ability to create new Users and Groups. It is most likely that only one or two User Names and Passwords will have 'ADMINS' authority.
Your Responsibilities.
Determine who is authorised to access Spike.
Ensure all individuals who are authorised to access Spike have a User Name and have selected their own password.
Spike contains a default Name 'Admin' and this entity has full 'ADMINS' Group access/authority but initially no password has been allocated. The Name 'Admin' cannot be deleted, and it is recommended that a password be allocated to this Name before creating other users. You may wish your primary user to log-on as 'Admin' rather than set-up a password under their own name.
When you have completed the previous action, you can then add other individual's names and passwords, and give any primary users (eg. Director and/or Clerical Officer) 'ADMINS' Group authority.
Apart from the original Name 'Admin', only individuals who are designated as a member of the 'ADMINS' Group will have authority to create new Users and new Groups.
Services that are existing users of Spike can implement password security at any time they decide it would be useful, or necessary, to protect their data from unwanted access.
If you are a service using Spike for the first time and wish to implement password security, it is recommended that the users and passwords be set-up prior to entering data into the software.
5.1. Steps to: Assign a password to Admin
Select SYSTEM / PASSWORDS.
In the USERS Tab - check that the Name: 'Admin' is highlighted in the bar in the top of the window.

Confirm that ADMINS is highlighted in both the 'Group' and 'Member of:' sections in the window.
Select the CHANGE LOGON PASSWORD Tab
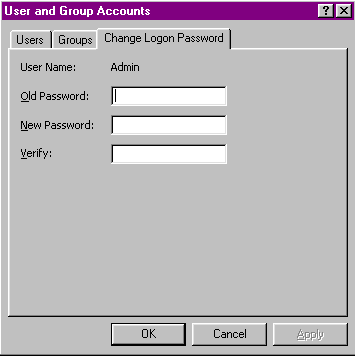
As this is the first password to be assigned to this User Name - Leave 'Old Password:'Blank.
Enter the New Password for this User Name.
Re-Enter the New Password to Verify.
Select OK.
The next time anyone logs-on to Spike, they will need to enter this New Password.
Steps to: Create a New User Name
Select SYSTEM / PASSWORDS.
In the Tab - USERS, select NEW.
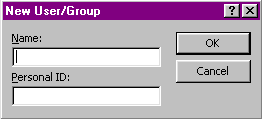
Enter the User Name you wish to create.
Enter a Personal ID.
This needs to be four (4) or more characters long and is of no consequence to the User, it is simply an ID for the software's security. It is entered once and never seen, nor used again.
Select OK.
Your new User Name should now be highlighted in the Name Draw-Down Selection List.
If this User is to only have 'USERS' access, simply leave all settings as they are with the 'Member Of:' box containing USERS.
If this User is to have ADMINS access, highlight ADMINS in the 'Available Groups' screen, then select ADD, you will now see both USERS and ADMINS in the 'Member Of:' screen.
Repeat this process for every User Name needed to be created, then select OK.
Steps to: Assign/Change a Password to a User Name
First, the User must enter Spike and log-on with their current password, if this is the first time this User is logging in, the password is left blank.
Select SYSTEM / PASSWORDS.
Select the CHANGE LOGON PASSWORD Tab-
Enter the Old Password, if this is the first password to be assigned to this User Name - Leave Blank.
Enter the New Password for this User Name.
Re-Enter the New Password to Verify.
Select OK.
The next time this User logs on to Spike, they will need to enter their New Password.
Steps to: Edit a User Name's Group Membership
First, you must log-on with an ADMINS User Name.
Select SYSTEM / PASSWORDS.
Select the User Name you wish to edit from the Draw-Down Selection List.
Select the Group you wish to Add to this User Name from the 'Available Groups' list.
OR
Select the Group you wish to Remove from this User Name from the 'Member Of' list.
Select ADD/REMOVE.
Select OK.
Steps to: Delete a User Name
First, you must log-on with an ADMINS User Name.
Select SYSTEM / PASSWORDS.
Select the User Name you wish to delete from the Draw-Down Selection List.
Select the DELETE.
Confirm that you wish to delete this User Name(Account).
You are now unable to use or access this User Name.
Steps to: Clear All Passwords
If at any time your service no longer wishes to have password access to Spike, it will be necessary to remove or clear all existing passwords from the system.
The previous section 'Steps to: Delete a User Name' will also delete the passwords associated with the User Names being deleted. However, it is not possible to delete the User Name 'Admin' so it will be necessary to 'Clear' any password associated with that User.
First, you must log-on with an ADMINS User Name.
Select SYSTEM / PASSWORDS.
In the USER Tab ensure that the User Name: Admin is highlighted in the bar.
Select the CLEAR PASSWORD button.
You will no longer be prompted to enter a password when logging-on to Spike under that User name.
N.B. If you choose to 'Clear All Passwords' instead of deleting User names, any previously created User Names will still exist and can simply have passwords re-assigned to them by following the 'Steps To: Assign a Password to a User Name'.