Chapter 7. Customise the Centre/Service Groups
When first entering service details, or if the service decides to open a new group, you will need to tell the computer about that group. This must be done in time for the first session that the group is open, so that you can produce an Attendance Sheet. The software needs to know the name of the group and its REPORTING CATEGORY.
 | The GROUP Draw Down Selection List contains sample GROUPS which can be edited to relate to your service |
Your Responsibilities.
To update the software so that it has all the information it needs about your service's groups.
To ensure all Groups have had Reporting Categories assigned to them before booking children to that group.
Steps to: - Edit the Groups
Select menu BOOKING+BILLING / GROUP.
This brings forward the SELECT GROUP window.
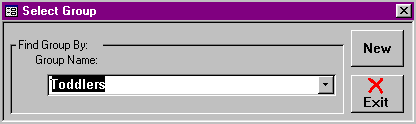
Click on the thick black arrow next to the text box to display the Draw Down Selection List of Groups.
Click on the Group you wish to edit.
Double Click on the name of the Group.
This will bring forward the edit/update screen.
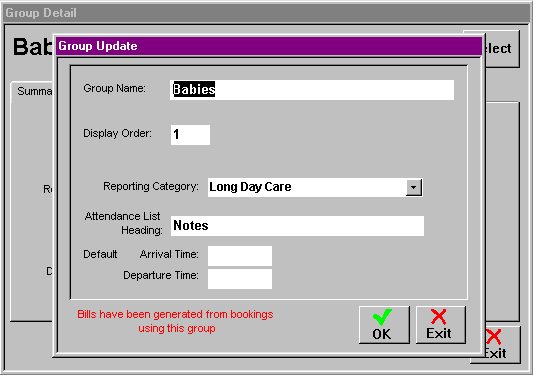
If different, enter the NAME you wish to call this group.
Enter the DISPLAY ORDER NO. you wish this Group to appear.
Choose the REPORTING CATEGORY applicable to this Group from the draw-down selection list.
Enter the ATTENDANCE LIST HEADING (defaults to Notes).
OPTIONAL!!
You can enter arrival and departure times for a group day, but these times will reflect the earliest arrival time and latest departure time in a billed day. By entering these times it will save your time when entering bookings. However, when booking a half day you will need to remember to change either the arrival or departure time to reflect the session you are booking (eg. morning or afternoon session). Please remember the actual times are entered by the family, these times are the maximum hours that the child can be in care for a particular charge type.
This is an optional feature, if it doesn't suit your service, or you prefer to enter actual times into Spike you don't have to use this feature!
If it does suit your service, enter the time/s in the appropriate field.
Select OK when you have finished.
Repeat this process for each of the service's groups.
Steps to: - Adding a New Group
Select menu BOOKING+BILLING / GROUP.
Click on the NEW button.
Follow the steps above.